
[ CLICK SIGN UP ]
About Me
Advanced Usage of Avira AntiVir Rescue System BootCD
Few days ago I had to deal with a virus that is very very hard to remove. So the best and easiest way to remove it is using an antivirus rescue CD. When you boot up the computer with a rescue cd which is usually a linux live CD, Windows is not loaded and the virus is inactive. This makes it  easier for the antivirus to detect and clean the virus. I have encountered viruses that corrupts Windows so badly until you can’t even boot in to Safe Mode, you cannot install any antivirus because it auto terminates it and you can’t pin point where the virus is added to Windows auto startup location as it replaces one of your legitimate Windows system file.
Normally my first choice is to use Kaspersky Rescue CD but I had problems downloading it as I am getting very slow download speed. It managed to download until half way and then time out. Moreover it has been 2 months since Kaspersky Rescue CD last updated and I didn’t want to spend more time downloading the virus definition. I like Quick Heal Native Boot Scan as well but I didn’t want it to auto fix suspicious files that it finds. There is no way to configure it. Finally came Avira which is one of my favorite too. The Rescue CD ISO image file which is only 53MB in size and took only 7 minutes to download. The bootcd was last updated few days ago and I know I didn’t have to spend a lot of time updating the virus definition. When I boot up my Acer laptop with Avira AntiVir Rescue System, everything seems fine and was presented with a simple looking graphical user interface. When I click on any options such as “Remove infected files”, “Try to repair infected files” or “Rename Files, if they cannot be removed”, the whole system hung, and there is no respond at all. Sadly this is a bug that happens to most laptops such as Acer, Dell and HP. If you encounter such problem, here is how you can continue using Avira AntiVir Rescue System without relying on the GUI.
Just boot up the Avira AntiVir Rescue System as normal. Then press the number 1, hit enter and it should start loading vmlinuz and initrd.gz.
When the graphical user interface is fully loaded, simultaneously press Ctrl+Alt+Backspace.
That will bring you in to a black colored console screen that looks like DOS. Before you start typing anything, please be informed that the antivirus is programmed to type in German keyboard layout. For example, when you press the – key on your keyboard, you’ll notice that it chances to ß. Refer to the image below on what to type to get what character.
First we need to update the virus definition to the latest version. To do that, type the following command. There are TWO dashes.
antivir --update
To start a full scan, type the following command below. In Linux, everything is case sensitive. The Devices must have a capital D. What the command below does is scan everything on your hda1, tries to repair the infected files and rename the non-repairable files by adding a .xxx extension. You can also substitute the -ren command with -del to auto delete the non repairable files.
antivir -s -e -ren /media/Devices/hda1
When Avira AntiVir Rescue System has finished scanning, you should be able to boot in Windows. You can search in Windows for *.xxx files. These are the files that are non-repairable by Avira. You can get a list of command lines by typing antivir --help but you won’t be able to scroll up to see all the commands. So here are all the commands for your convenience.
Usage is: antivir [options] [path[\*.ext]] [*.ext]
where options are:
--help .......... display this help text (abbreviation: -h or -?)
--scan-mode=applies "extlist", "smart" or "all" scan methods:
extlist scans files according to their filename extension,
smart detects which files to scan from their name/content,
all scans all files regardless of their name or content
--allfiles ...... synonymous for --scan-mode=all
--version ....... show version information
--info .......... show list of recognized forms
--update ........ update antivir
--check ......... used with --update to check for updates
--temp=(dir) .... specify the directory for temporary files
--pid-dir=(dir) . specify the directory for PID files
--home-dir=(dir) location of executable, VDF and key files
-C (filename) ... name of configuration file
-s .............. scan subdirectories
--scan-in-archive files in archives will be extracted and scanned
-z .............. synonymous for --scan-in-archive (scan in archives, too)
--archive-max-size=N, --archive-max-recursion=N, --archive-max-ratio=N
anti DoS feature: do not scan archive content which would
exceed the given file size, nesting level or compression
factor limits on extraction (0 means unlimited)
--archive-max-count=N anti DoS feature: do not scan archive content which
has more than N files in a recursion level
--scan-in-mbox .. scan mailbox folders, too (might be time consuming!)
--heur-macro .... enable macro heuristics
--heur-nomacro .. disable macro heuristics
--heur-level=N .. setup heuristics level: 0=off, 1-3=low-high
-nolnk .......... do not follow symbolic links
-onefs .......... do not cross file systems while following links
-noboot ......... do not check any boot records
-nombr .......... do not check any master boot records
-nobreak ........ disable Ctl-C and Ctrl-Break
-nodef ......... do only check the given file types (eg. *.DOC)
-cf(filename) ... activate CRC check and name the database
-cv ............. calculate CRC over the whole file length (default 16k)
-cn ............. insert new files into the database
-cu ............. recalculate CRC values and update the database
-v .............. scan files completely (slower with possible false alerts)
-nopack ......... do not scan inside packed files
-e [-del | -ren] repair concerning files if possible
[-del] non-repairable files will be deleted
[-ren] non-repairable files will be renamed
-ren ............ rename concerning files (*.COM->*.XXX,...)
-del ............ delete concerning files
--moveto=(dir) .. quarantine concerning files
-dmdel .......... delete documents containing suspicious macros
-dmdas .......... delete all macros if one appears to be suspicious
-dmse ........... set exit code to 101 if any macro was found
-r1 ............. just log infections and warnings
-r2 ............. log all scanned paths in addition
-r3 ............. log all scanned files
-r4 ............. select verbose log mode
-rs ............. select single-line alert messages
-rf(filename) ... name of log file
%d = day, %m = month, %y = year (two digits each)
-ra ............. append new log data to existing file
-ro ............. overwrite existing log file
-q .............. quiet mode
-lang[:|=]DE .... use German texts
-lang[:|=]EN .... use English texts
-once ........... run only once a day
-if(dateiname) .. antivir uses the given ini file
--with-(type) ... detect other (non-virus but unwanted) software, too;
type may be e.g. "dial", "joke", "game", etc,
there is a --with-alltypes shortcut
--without-(type) like --with-(type), but disables this type
--alltypes ...... synonymous for --with-alltypes (obsolete)
--alert-urls=(yes|no) print URL for more detailed information on alerts
--warnings-as-alerts exit with a return code as if a concerning file
had been found when warnings have been issued
--exclude=(file) exclude files or directories from scan
--log-email=(addr) send out scan report by email, too
@(rspfile) ...... read parameters from the file (rspfile)
with each option in a separate linelist of return codes:
0: Normal program termination, nothing found, no error
1: Found concerning file or boot sector
2: An alert was found in memory
3: Suspicious file found
100: antivir only has displayed this help text
101: A macro was found in a document file
102: The option -once was given and antivir already ran today
200: Program aborted, not enough memory available
201: The given response file could not be found
202: Within a response file another @(rsp) directive was found
203: Invalid option
204: Invalid (non-existent) directory given at command line
205: The log file could not be created
210: antivir could not find a necessary dll file
211: Programm aborted, because the self check failed
212: The file antivir.vdf could not be read
213: An error occured during initialization
214: License key not found
Labels: Software
Easily Optimize Firefox SQLite Databases with SpeedyFox Portable
Mozilla Firefox is by far the best feature-rich and fastest browser out there, but with the passage of time it slows down considerably. It will take a lot of time to load during startup, the overall speed will be effected, and browsing Histories will be too slow. This is very common problem and it occurs largely because of fragmentation of databases. Starting from Firefox version 3, the development team has made Firefox to use SQLite databases to store information.
If you go to your Firefox profile folder, you should see a bunch of files ending with .sqlite extension. There are a total of 10 sqlite databases which is content-prefs.sqlite, cookies.sqlite, downloads.sqlite, formhistory.sqlite, places.sqlite, permissions.sqlite, search.sqlite, signons.sqlite, urlclassifier3.sqlite and webappsstore.sqlite. Searching the Internet reveals a lot of guides and even Firefox addons that can automatically “vacuum” or optimize Firefox database but most of them only does it on the places.sqlite database file which is the main culprit for a crawling slow Firefox. It works but wouldn’t it be better if we can optimize ALL of the Firefox databases? Thanks to SpeedyFox we can now do that.
SpeedyFox is a brand new small utility that fixes this problem with a single click! It seems unbelievable but after you optimize your Firefox with this tool, you will get a fresh newly-installed feel because the speed indeed gets considerably faster. You will get up 3 times faster startup speed, browsing history will become faster, and performing operations with cookies will be quicker than before.
Once installed, SpeedyFox automatically detects your Firefox’s default profile. If you have more than one profile, you can select the one you want to optimize from the drop-down menu. All you have to do is select the default profile that you want to optimize and hit Speed Up Firefox button. The optimization process can take anywhere from 5 minutes to an hour depending on how large your databases are. The whole optimization process is safe as it does not effect your history, bookmarks, passwords, etc.
There are 2 versions of SpeedyFox, the installer and the portable version. I personally prefer the portable version so it doesn’t add any information to the registry and runs from anywhere. It is free and currently only works on Windows. Soon there will be versions that runs on Mac and also support of portable Firefox. Make sure you close your Firefox browser first before clicking the “Speed Up My Firefox” button from SpeedyFox!
Labels: Software
Integrate Multiple Antivirus Rescue Disk into One Single Disc or USB Flash Drive with SARDU
Antivirus Rescue Disk is one of my must have CD to carry along with me whenever I have any computer servicing job. When a virus infects a computer, it normally makes Windows very unstable, slow and probably even terminate any antivirus or anyspyware software that it finds making it impossible for you to clean the virus from Windows. All I needed to do is to boot up the computer with an antivirus rescue disk, run a full scan and remove any virus that it finds. By doing that, 90% of the virus are normally gone and it should leave me with a Windows that I can boot in and work on restoring the disabled regedit, Windows Task Manager, cmd and etc.
The last time I checked there were about 13 rescue disks, most are free to use and only a few that requires to purchase. There are NO perfect antivirus as different antivirus has different detection rate. I wished I can bring all of the rescue disks with me but maintaining 13 rescue disks and making sure that I always have the latest version and definition is very troublesome and tedious. I tried using MagicISO, EasyBoot and a few more software which I can’t remember to put all the antivirus rescue discs ISO into one single DVD but the software cannot support such feature. So I gave up…
Yesterday I received an email from Davide Costa informing me that he has made a free tool called SARDU that can integrate multiple antivirus rescue disks, a few useful utilities, linux live CDs and also Windows PE. Not only that, the best part is it can be installed in a USB flash drive!
SARDU is short for Shardana Antivirus Rescue Disk Utility. It can handle ISO images of bootable antivirus, some collections of utilities, Linux Live CDs and the most popular distributions of Windows PE. It has been categorized into 4 sections, Antivirus, Utility, Linux and PE.
The first time you create a universal rescue disks ISO or to your USB flash drive can be time consuming because you need to download around 2.6GB of ISO images if you want to integrate all ISO that is supported by SARDU. After that, the whole process is very simple, thanks to SARDU for being a “smart” program that automatically recognizes the ISO image that you place into the ISO folder.Antivirus
Avira AntiVir Rescue System BitDefender Dr.Web LiveCD F-Secure GDATA Kaspersky ‘Kav Rescue CD’ Panda Safe Cd Utility
Floppy win98SE Gparted NT password Parted Magic System Rescue CD Ultimate Boot CD Linux
Austrumi Damn Small Linux Puppy Linux Slax Windows PE
LiveXP MegalabCD WindowsPE UBCD4WIN VistaPE
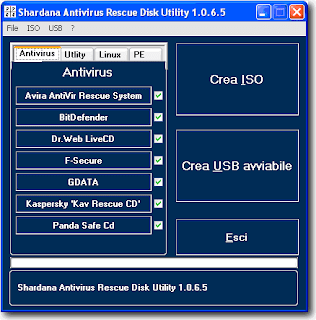
Here’s a simple guide on how to use Shardana Antivirus Rescue Disk Utility to create a bootable USB flash drive containing multiple antivirus rescue disks together with Linux LiveCDs, utilities and Windows PE.
1. Download the latest version of SARDU.
2. Extract SARDU to a new folder and run sardu.exe
3. To download the ISO image, simply click on the name in the program and your default web browser will open with the link to download the latest ISO. Save the file to the ISO folder where sardu.exe is located.
4. When you’ve finished downloading the ISO files, close sardu.exe and reopen sardu.exe. You will notice that SARDU has automatically put a check on the checkbox if the ISO image is found. If the checkbox is grayed out even though you think you’ve downloaded the file, then most likely you’ve downloaded the wrong one. The file has to be in ISO format, not ZIP or EXE.
5. You can either click on the “Crea ISO” button to compile all the ISO images into a single ISO to burn it to a DVD or click the “Crea USB avviabile” button to install it to your USB flash drive.
6. When you have your SARDU USB flash drive or DVD ready, boot it up and you should get a multiboot screen like the image below.
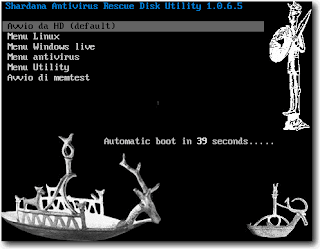
The advantage of installing SARDU on USB is you can do incremental updates so you don’t need to go through all the steps again every time you want to update a single ISO image. If you’re afraid that you will be facing computers with old motherboards that cannot support booting USB, you can always use PLoP.
Although the program’s user interface is in Italian, I’d say that it is still quite easy to use. Anyway, the author of SARDU informed me that he is making a structure to read language.ini for multilanguage support. We can expect an English translation soon…
SARDU is truly a gem! I just did a Google search on SARDU and it’s weird that not even a single blog out there has mentioned about it but I am very glad to be the first to share it with you… I wished I’d have known about SARDU earlier so me and I believe some of you can reduce the usage of CDRs on burning different rescue disks.
Guide for Making Full Windows Backup to Network Share Using Clonezilla

Norton Ghost by Symantec is my favorite disk cloning and imaging software because it’s easy to use but unfortunately the software cost money. Although the Norton Ghost software protection against piracy is not really that strict and I can use it on any computers, but I don’t want to risk getting caught using it illegally at customer’s place. Macrium Reflect is also another good Ghost alternative and the free version works well but we have to install the software in Windows and run it from there in order to create a full backup. The Macrium Live CDs can only be used to restore images but not for creating backup.
I’ve heard of Clonezilla before and it seems to be quite a hit because it is free and also clones computer pretty fast compared to other linux disk cloning software such as Partimage. I remembered testing Clonezilla last year but somehow didn’t really got it to work but today I had a little bit of free time and I was destined to get it to work. Well I am glad I did and was surprised that Clonezilla can make a full backup of my desktop computer with a very good speed. I am going to share with you on how to create a full backup of computer A and save the backup image to computer B via network. Why network? Because I don’t want to go through the hassle of unplugging the hard drive and connect it to another computer. This tutorial requires you to have a little knowledge on networking and user accounts.
You can either use Clonezilla Live CD or USB whichever is convenient for you. Making a Clonezilla Live CD is easy as you only need to download the ISO image file and burn it to a CD. To make a Clonezilla Live Bootable USB, the easiest way is to use Live USB Helper. Do take note that Live USB Helper requires the ZIP version of Clonezilla, not the ISO version.
Remember, this tutorial is based on a scenario to create a full backup of Computer A to Computer B. Before we can start the backup process, we’ll need to share a folder on Computer B first and assign a user to have write access to the folder. Once you’ve done that, follow the steps below.
1. Boot up Clonezilla Live on the computer that you want to backup.
2. Hit enter to select the default “Clonezilla live (Default settings, VGA 1024×768)”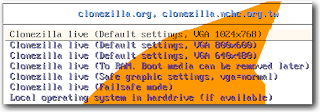
3. Choose your language and hit Enter.
4. Hit enter to select the default “Don’t touch keymap”
5. Hit enter to select Start Clonezilla.
6. Hit enter to select device-image. This selection will allow Clonezilla to save your hard drive or partition into an image file.
7. Select “samba_server” and hit Enter. This option is if you have another computer on the network which is running Windows and you want to save the backed up image to that computer’s shared drive.
8. Hit enter to select dhcp. If you are able to connect to the network and use the Internet by plugging in the network cable or using wi-fi, then 99% of the time you already have DHCP service running.
9. Enter the IP Address of the computer (Computer B) where you want to save the image to. You can also enter computer name.
10. Hit the tab button twice until the Cancel option is selected. Then hit Enter.
11. Enter a user account that is valid on Computer B that has permission to access the shared folder.
12. Enter the directory where Clonezilla image will be saved to. This is the name of the folder that is shared. For example, /images and hit Enter.
13. Hit enter when asked you to enter password.
14. Now type in the user’s account password followed by Enter.
If you’ve entered a correct user account and password, it’ll show a list of file system disk space usage. Hit Enter again.
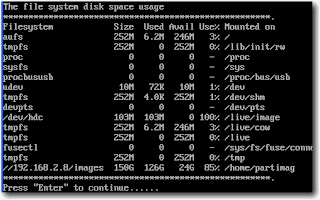
15. Hit enter to select Beginner mode.
16. You can now select if you want to backup the whole hard disk or just partition. To save local disk as an image, select savedisk and hit Enter.
17. Input a name for the saved image to use and click OK.
18. If you only have one hard disk, Clonezilla will automatically select the drive for you. Hit Enter to continue.
19. Hit Enter to continue.
20. Final confirmation. Press Y on your keyboard and hit enter.
Clonezilla will now start creating the image and simultaneously transfer it to Computer B shared drive. On a 100Mbps network, Clonezilla is showing a rate of 200MB/min. The whole processed of creating a full backup image of my Windows XP computer and saved it to another computer finished in just 7 minutes! Clonezilla is really impressive! This is only one example of how to use Clonezilla to make a backup image of a computer. You can also do disk to disk cloning and multicasting. By the way, the image file will be saved in gzip format, an open source file compression program. So you can extract the image file using any ZIP extractors to access the files.
Note: Been a very busy weekend. I will now start to compile all the entries for the BitDefender Internet Security 2010 and choose the winners by randomly shuffling the list. Sorry for the delay.Labels: Software
contact
yahoo: s.hitechvnn
